Showing posts with label Exchange Server. Show all posts

Monday, June 1, 2020

Convert to GPT from MBR without losing any data (work on Exchange DAG)

Hi,
Recently my exchange server 2016 DAG was running out of space, my database reaches 2 TB and the MBR cannot be extended anymore, so I need to convert to GPT. I tried Diskpart, which is a good builtin tool using the following command, but it fails and returns the following error

Virtual Disk Service error:
The specified disk is not convertible. CDROMs and DVDs
are examples of disks that are not convertable.

Based on some googling and reading it seems that this command will work fine if I clear the disk (format it) which cause a full data lost on the disk, and this is not applicable on my case, I have 2 exchange server 2016 with 2TB of data on one of the disk, resyncing the data will take several days.

The Fix
I find this super tools
https://sourceforge.net/projects/gptgen/files/gptgen/v1.1/gptgen-1.1.zip/download
Just download it and place it on drive C: or whatever drive other than you want to convert and run the following command gptgen.exe, the output will be

where device_path is the full path to the device file,
e.g.\\.\physicaldrive0.

Available arguments (no "-wm"-style argument combining support):
-b , --backup : write a backup of the original MBR to
-c nnn, --count nnn: build a GPT containing nnn entries (default=128)
-h, --help, --usage: display this help message
-k, --keep-going: don't ask user if a boot partition is found
-m, --keepmbr: keep the existing MBR, don't write a protective MBR
-w, --write: write directly to the disk, not to separate files

One of the required parameters is the disk number and we can get it from Diskpart, using the following command
> Diskpart
>> List disk


You need to know the disk number you want to convert. Let's assume that the disk you want to convert is disk 1, just remember the number, now exit Diskpart and navigate to GPTGen and execute the following command
gptgen.exe -w \\.\physicaldrive1

The -w parameter is used to write GPT table and is required in the converting process, just make sure to write the correct disk number, in my case, it's 1.
The output will be similar to


That easy, GPT without losing any data
No need to reboot, even though I recommend to reboot and make sure that everything is working fine. Also, I recommend before doing, try to minimize IO on the disk, place the server in maintenance mode, turn the services off, and also backup your data if you can. Gptgen have the option to backup the current MBR before converting it.

Enjoy :D


Sunday, November 30, 2014

Block Outlook from connecting to Public Folder

In some cases, you may need to prevent outlook to connect to Exchange Public Folder.
I had a case where Outlook 2010/2013 is connecting to a remote exchange server, connecting to public folder cause some connection delay.
These client dont need to use Exchange Public Folder, so its better to disable Public Folder Connection.

Now you have 2 options:
1- Delete Public Folder.
2- Prevent Outlook from connecting to public folder

Today I will talk about how to prevent outlook 2010/2013 from connecting to Public Folder.

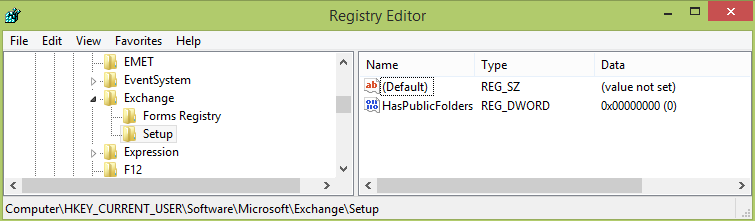
To do so you will need to create/edit a small registry value called
Name: HasPublicFolders
Value: 0
Type: DWORD

The Path for this value is HKEY_CURRENT_USER\Software\Microsoft\Exchange\Setup
If the Setup Key is not exist, then simply create it and then create the DWORD value


You can automatically create the key and the value using the following CMD line

reg add HKCU\Software\Microsoft\Exchange\Setup /f /v HasPublicFolders /t REG_DWORD /d 0 

The line is explained as the following
REG: is the cmd registry controling tool 
ADD: parameter to tell the reg tool that you are adding / creating a key or a value
HKCU...: The path of the key you want to create the value under, if the key is not exist then it will be created
/f : To force overwrite the value if exist
/v: Value Name
/t: Type of the value
/d: parameter after the /d is the value of the entry, in this case it is 0

for more information about REG tool you click here (http://technet.microsoft.com/en-us/library/cc732643.aspx)


Hope you like it, feel free to leave you comment below and share it with your friend to support me :)

Sunday, September 14, 2014

Exchange 2010 / 2013 Server Single Instance Storage.... is gone

Exchange Single Instance Storage (SIS)

What is SIS

SIS creates a single instance of messages sent to multiple recipients within the same database. Simply said, the first one gets a copy of the message in his or her mailbox, others get a referral to the message.

Why it was used?

In old days where Storage were really limited, most of the mailboxes reside on a single database, and even the Disk Disk performance was not that good and the good performance disk was really expansive, so SIS saved a lot of Disk IO and space.

So what is the benefit:

This Really save a lot of space and Disk IO on the database.
Exchange SIS was used on all version of Exchange from the beginning till Exchange 2007, In exchange 2007 SIS will only be enabled to the attachments only, which wont offer much regarding for performance or disk space saving.

Why its being removed?

Starting the disk price are getting low and storage now are cheap.
Users mailboxes are distributed between several database.
Microsoft had enhanced ESE performance more than all other previous version of Exchange, so SIS will not be the performance saving anymore.
Microsoft ESE now compress the message Body and header by default which will be a better saving.

What about Attachments, are they compress too?

The answer is NO, There is no need to compress the attachment for:
1- compressing and decompressing will be CPU intensive
2- Most of the attachments are already in compressed state (Zip - PDF - Docx - JPG)

Is compression the answer to replacing single instancing all together?

The answer to that question is that it really does depend. There are certain scenarios where SIS may be viable:

Environments that only send Rich-Text Format messages. The compression algorithms in Exchange 2010 do not compress RTF message blobs because they already exist in their most compressible form.
Sending large attachments to many users. For example, sending a large (30 MB+) attachment to 20 users. Even if there were only 5 recipients out of the 20 on the same database, in Exchange 2003 that meant the 30MB attachment was stored once instead of 5 times on that database. In Exchange 2010, that attachment is stored 5 times (150 MB for that database) and isn’t compressed. But depending on your storage architecture, the capacity to handle this should be there. Also, your email retention requirements will help here, by forcing the removal of the data after a certain period of time.
Business or organizational archives that are used to maintain immutable copies of messaging data benefit from single instancing because the system only has to keep one copy of the data, which is useful when you need to maintain that data indefinitely for compliance purposes.

Community thinks?

- Even if disk are cheap, we still need to take care of it insted of wasting the space for having several copy of the email !

Yes, sure but content compression should offer a good disk saving.
- And what about attachment?
Simply if you really have it as an issue, you will need use Sharepoint or third party email attachment management.

- What is the Compression MS used
- From Here
- Wikipedia

If you like this post, please feel free to comment, like and share it

Thursday, October 31, 2013

Error message when Outlook clients synchronize an OAB with Exchange 2007: "0x80190193"

There are several cause for 0x80190193, generally this error mean that it fail to download the Offline Address Book from Microsoft Exchange server.
the most common reason for this is that OAB is requiring HTTPS connection, and outlook using not using HTTP connection, How to know ?
Hold the CTRL key and Right Click on Microsoft Outlook tray icon and select Test E-mail Autoconfiguration.


Notice that OAB URL is using HTTP. so now lets check it on the server side
Login to Exchange server that had Client Access Server
- Open IIS --> Default WebSite --> and click on OAB virtual directory
on the Feature View panel click on SSL Settings and make sure that Require SSL is deselected


open CMD and type IISRESET, Make sure that the services are back to normal using powershell command Test-ServiceHealth
You have to do this on all CAS server you have.
Thats it, enjoy your day.
These errors can also caused by bad autodiscover configuration or SSL problem, alot of reason, but this one I write is the common

Wednesday, July 31, 2013

Your request couldn’t be completed. This may have occurred for security reasons

Problem:


This problem happend when you are using HTTP for OWA insted of HTTPS like http://OwaServer
When the user open his OWA, it seem that everything is OK, but when opening any folder or sometime messages it just display the error message "Your request couldn’t be completed. This may have occurred for security reasons".
NOTE: This problem wont happens when the users are using HTTPS

FIX:
The solution is editing the web.config file and change the requireSSL=”true” to “false” , see the steps below :


  1. Find the Outlook Web App Web.config file on the Client Access server. The default location is \Program Files\Microsoft\Exchange Server\EXCHANGEVERSION\ClientAccess\Owa.
  2. Make a backup copy of the file (Important!)
  3. Open the original file using Notepad. (You may need to run it as Administrator)
  4. Find httpCookies httpOnlyCookies=”false” requireSSL=”true” domain=”” and change the requireSSL flag to false.

Save and close the file.

For the new settings to take effect, open a Command Prompt window, and then type iisreset to restart IIS using the command iisreset /noforce

Sunday, May 26, 2013

Remove Exchange Server 2003 From Cluster that include Exchange 2010

When you have Exchange server version 2007 or 2010, it will be highly recommend to remove the old exchange server (2003), if exists. 
Some of the things you will be limited to do when having Exchange 2003 installed is Address list.
when trying to make a new address list you will get a message stating that there is a legacy exchange server version installed, and you have to remove it.
Anyone who worked with Exchange server 2003, will know how to install it and uninstall it. But when it come to cluster it will become more confusing.
In this article I will explain how to remove exchange server 2003 from Cluster.

Preparing to remove Exchange 2003
First to be able to remove Exchange 2003 you have to consider the following:
1- First the Mailbox Database should contain no mailbox, All mailboxes should be moved to another server  (Exchange 2007 or Exchange 2010)
2- Also move Public Folder Data to ensure there will be no data lost
3- Make sure to set the Exchange 2007, 2010 to be OAB Generator 
4- Remove the Recipient Update Service

Removing Exchange 2003 Cluster resource:
Now we are ready to remove the Exchange Server 2003 From our Cluster, and to remove Exchange From the Cluster, we have to remove the Exchange System Attendant using the Cluster Console.
1- Open Microsoft Cluster Console.
2- In the Group, you wil find the Exchange Group.
3- Make sure that the Exchange System Attendant resource is offline
4- Rght Click on the SA resource and then Right Click and select "Remove Exchange Cluster Resource"

this error need to use LDP tool, for me Powershell is easier and better.
What is this error:
Remember on Exchange 2003 when you create a mailbox user the user is not shown in the console unless the user receive an email or the user login to that mailbox, otherwise it will not appear.
So what can you do, you can use Powershell Script :
get-aduser -properties * -filter{msExchHomeServerName -like "*YouOldServerName"}
Where YourOldServerName represent your Exchange 2003 Server, leave the asterisk before the server name and dont include space.
This will return a list of users that have their mailbox on your old Exchange Server.
Now everything should be OK, you can remove the Binaries using Add/Remove Programs

for more information you can read this Article from Microsoft